Tuesday, October 25, 2016

Oracle Fusion Middleware New Version 12c (12.2.1.2.0) Released

Oracle announced the launch of new version of Oracle Fusion Middleware (12.2.1.2.0) that includes the following products:
·         Oracle WebLogic Server 12c (12.2.1.2.0)
·         Oracle Coherence 12c (12.2.1.2.0)
·         Oracle TopLink 12c (12.2.1.2.0)
·         Oracle Fusion Middleware Infrastructure 12c (12.2.1.2.0)
·         Oracle HTTP Server 12c (12.2.1.2.0)
·         Oracle Traffic Director 12c (12.2.1.2.0)
·         Oracle Fusion Middleware WebLogic Server Plug-In 12c (12.2.1.2.0)
·         Oracle SOA Suite and Business Process Management 12c (12.2.1.2.0)
·         Oracle B2B and Healthcare 12c (12.2.1.2.0)
·         Oracle Service Bus 12c (12.2.1.2.0)
·         Oracle Stream Analytics 12c (12.2.1.2.0)
·         Oracle Managed File Transfer 12c (12.2.1.2.0)
·         Oracle MapViewer 12c (12.2.1.2.0) 
·         Oracle Data Integrator 12c (12.2.1.2.0)
·         Oracle Enterprise Data Quality 12c (12.2.1.2.0)
·         Oracle Enterprise Pack for Eclipse 12c (12.2.1.2.0)
·         Oracle GoldenGate Studio 12c (12.2.1.2.0)
·         Oracle GoldenGate Monitor 12c (12.2.1.2.0)
·         Oracle GoldenGate Veridata 12c (12.2.1.2.0)
·         Oracle JDeveloper Studio 12c (12.2.1.2.0)
·         Oracle Forms and Reports 12c (12.2.1.2.0)
·         Oracle WebCenter Portal 12c (12.2.1.2.0)
·         Oracle WebCenter Content 12c (12.2.1.2.0)
·         Oracle WebCenter Sites 12c (12.2.1.2.0)
·         Oracle Business Intelligence 12c (12.2.1.2.0)

Get more details from below links.

https://blogs.oracle.com/soaproactive/entry/oracle_fusion_middleware_12c_12

http://docs.oracle.com/middleware/12212/cross/getstartedtasks.htm


Friday, September 16, 2016

SOA Cloud - Creating an Oracle SOA Cloud Service Instance

Earlier to this post, I have written couple of posts to get started with Oracle Cloud. In this post, I will show you how to create instance of Oracle SOA Cloud Service.

There are some pre-requisites that you need to fulfill as mentioned below, before you proceed with this post.

1.  Create Oracle Storage Service Container. Refer this post to create the container if already not done.
2.    Create Oracle Database Cloud Service Instance. Refer this post to create the instance for Oracle Database Cloud Service if already not done.


Login with your credentials that you have received from Oracle when you register for trial version.


Oracle Cloud Login


Click on “Service Console” option as shown in below screen shot in “Oracle SOA Cloud Service” section.

Oracle SOA Cloud Service Console


Click on “Create Instance” button to initiate the process of Instance creation.

Oracle SOA Cloud Create Instance


Step 2:  Services Type: Here you need to choose service type that has multiple options. You can select SOA and OSB cluster if need to use both the tool or choose any other option as per your requirement.

Oracle SOA Cloud Service Type


Step 3: Image: Here you need to choose the version, for this post, I have selected latest version which is 12.2.1.

Oracle SOA Cloud Service Image


Step 4: Details: Here you need to fill all required details to create SOA cloud instance.

First go to “Instance Configuration” and fill Instance name along with description if needed. For this post, I have given “SOACloud” as instance name.

Change the cluster size if needed as by default it will be “1” and change computer shape in needed.

You need to browse the public key file that you have created earlier.

Oracle SOA Cloud Instance Details


Now fill details for admin user credentials. In later posts I will use same user to login to various consoles.

Oracle SOA Cloud Service Weblogic Admin Credentials

Now enter required data base details like Database Service Name, PDB name, user credentials. All these details you get when you create Database cloud service instance.

Oracle SOA Cloud Service Database Configuration


You also need to enter details for Storage container and you get these details when you create Oracle Storage Service Container.

Oracle SOA Cloud Service Storage Container


Step 5: Confirmation: Review the detail and click on create to create to the instance.

Oracle SOA Cloud Service Confirmation


Once you complete all above step, you see below screen.


Oracle SOA Cloud Service Instance

Thursday, September 1, 2016

SOA Cloud - Create Oracle Storage Cloud Service Container

In this post, I will show how you can create container for Oracle Storage Cloud Service.Oracle Storage Cloud Service container is required before we proceed further with creation of Oracle Database Cloud Service and SOA Cloud Service. You will not be able to configure SOA Cloud service until and unless we create this container.

Before you proceed to this post, you need to install OpenStack client. You can refer this post to see how to install it.

Follow below steps to create the Oracle Storage Service Container.

Step 1:Replication Policy: Open your service dashboard and go to Oracle Storage Cloud Service. By default replication policy is not set so you need to set it first. To set it click on “Set Replication Policy” option.

Create Oracle Storage Replication Policy


Choose any one replication policy, for this post, we have selected em2.

Oracle Cloud Storage Choose Replication Policy


Step 2: Download and Install OpenStack client:  you can follow this post to check how to install OpenStack client.

Step 3:Connect to Storage Cloud: Before you proceed with connection, you should be aware about your data centre, you can check your data centre by clicking on Oracle Storage Cloud Service as shown below.

Oracle Cloud Storage Data centre


Open the CloudBerry explorer and go to File and select “New Oracle Cloud Account “option.

Oracle Cloud Storage New Oracle Cloud Account


In below window, enter required details as explained below.

Display Name: Name of the identity domain that includes your cloud service instances.

User Name: Enter the name of the account in this format: Storage-Identity_Domain:Oracle_Cloud_user. 

Identity_Domain is the name of your identity domain and Oracle_Cloud_user is the user name of your Oracle Cloud service.

Password: Enter your Oracle Cloud service password.

Authentication Service: This will be based upon your data centre location and comes by default when you select Account location.

Account location: Use the value based on data centre.
Keystone version: Use the default value, which is Do not use.
Oracle Cloud Storage Account Details


Click on “Test Connection” to test the connectivity and it should show connection successful message as shown below.


Oracle Cloud Storage Account Test Connection

Step 4: Create Container: Once you connect to Oracle Storage Cloud Service, next step is to create container, for that choose connection that you created in previous step in source drop down.

Oracle Cloud Storage Connection


Click on “Create Container” icon as shown below.

Oracle Cloud Storage Create Container


Enter the container name and choose container type as “Standard”.

Oracle Cloud Storage Database Container


Similarly create another container for SOA cloud service.

Oracle Cloud Storage SOA Container


Once you create the container, you see list of all available container as shown below.

Oracle Cloud Storage Container List


SOA Cloud - Download and setup OpenStack Swift Client for Wiindows

In this post, I will show how you can install OpenStack Swift Client on windows machine which is freeware. This tool will be used to create container for SOA Cloud Service Storage container.

Follow below steps to download and install it.

Step 1: Download: Go to below link and click on “Download Freeware” option.

http://www.cloudberrylab.com/free-openstack-storage-explorer.aspx

OpenStack Freeware Tool Site


Once you click on above option, it takes you to next screen where you need to click on download to download the client.

OpenStack Freeware Tool Site Download


Step 2: Install: Once you download the client, you will have .exe file. Click on that file to run it.
It opens the welcome window, click on next.

OpenStack Freeware Tool Welcome

Accept the license agreement by clicking on “I Agree” button.

OpenStack Freeware Tool Accept License


Choose the destination folder and click on Install.

OpenStack Freeware Tool Folder


Click on finish and check the run option if need to open the client.

OpenStack Freeware Tool Success


Monday, August 22, 2016

SOA Cloud- Enable Outside Access to Oracle Database Cloud Service Instance

This post shows the steps that we need to follow to connect Oracle Database Cloud service Instance from JDeveloper or SQL developer. Before you start with this post, you need to have your Oracle Database Cloud service Instance and it should be up and running. If you haven't done already, you can visit below links.


Follow below steps to allow instance access from outside to perform various operations.

Step 1:  Go to your service instance that you have setup earlier and click on the top icon as shown in below screen shot and choose "Access Rules" option.

Oracle Database Cloud Service Access Rule


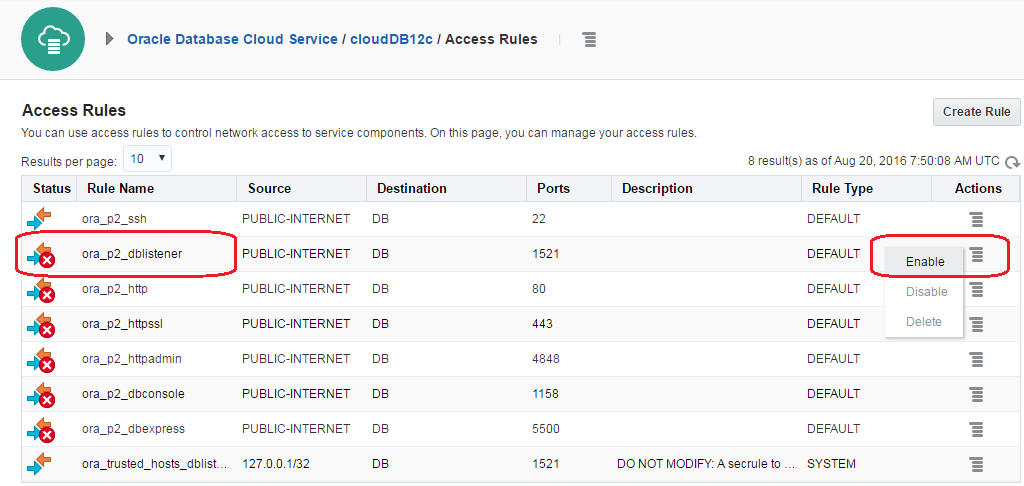
Step 2: To enable outside access second rule (ora_p2_dblistener) should be enabled which is disabled by default.

To enable it, click on the icon and choose "Enable" option.

Oracle Database Cloud Service Enable Access

Once you click on "Enable" it open below pop-up window to confirm about it, click on "Enable" to confirm it.

Oracle Database Cloud Service Enable Access Confirm


Once you confirm it start processing your request and after few seconds, you see below screen shot where second rule (ora_p2_dblistener) gets enabled.

Oracle Database Cloud Service Enable Access Processing


Step 3: Now you can test the connectivity, for this post, we have used JDeveloper but you can either JDeveloper or SQL developer to test the connectivity.

Mention the public IP in host name and fill other details. Once you click on test connection, it show success.

Oracle Database Cloud Service Enable Access Test