Monday, August 22, 2016

SOA Cloud- Enable Outside Access to Oracle Database Cloud Service Instance

This post shows the steps that we need to follow to connect Oracle Database Cloud service Instance from JDeveloper or SQL developer. Before you start with this post, you need to have your Oracle Database Cloud service Instance and it should be up and running. If you haven't done already, you can visit below links.


Follow below steps to allow instance access from outside to perform various operations.

Step 1:  Go to your service instance that you have setup earlier and click on the top icon as shown in below screen shot and choose "Access Rules" option.

Oracle Database Cloud Service Access Rule


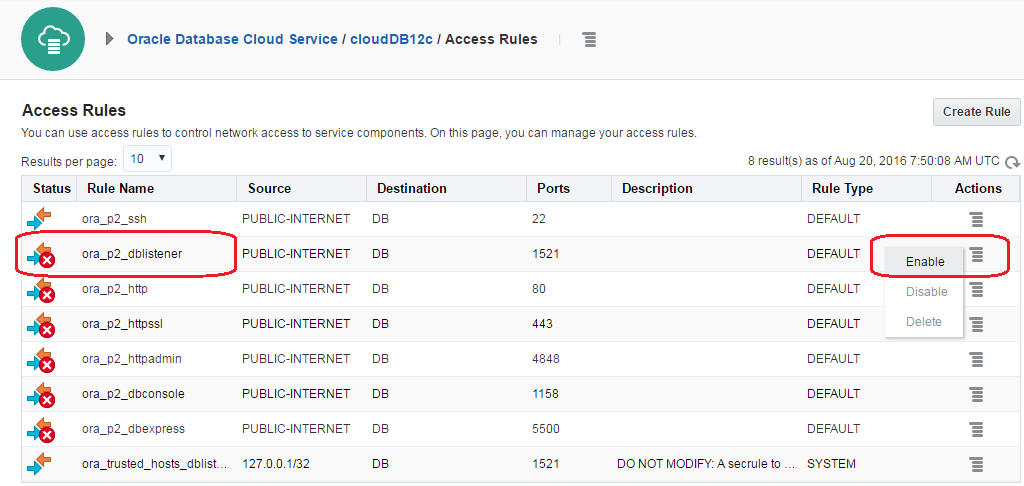
Step 2: To enable outside access second rule (ora_p2_dblistener) should be enabled which is disabled by default.

To enable it, click on the icon and choose "Enable" option.

Oracle Database Cloud Service Enable Access

Once you click on "Enable" it open below pop-up window to confirm about it, click on "Enable" to confirm it.

Oracle Database Cloud Service Enable Access Confirm


Once you confirm it start processing your request and after few seconds, you see below screen shot where second rule (ora_p2_dblistener) gets enabled.

Oracle Database Cloud Service Enable Access Processing


Step 3: Now you can test the connectivity, for this post, we have used JDeveloper but you can either JDeveloper or SQL developer to test the connectivity.

Mention the public IP in host name and fill other details. Once you click on test connection, it show success.

Oracle Database Cloud Service Enable Access Test


SOA Cloud- Start and Stop Service Instance of Oracle Database Cloud Service

In my last post, I shown how to create service instance of Oracle Database Cloud service. In this post, I will show how we can start and stop that service instance.

As mentioned in last post, once you create service instance, status of that instance is in "In progress" and it take around 30 minutes to get it ready. Once it is ready, you see something like below.

Oracle Database Cloud Service Instance


Click on your instance and it opens below window where you can see the public IP of your instance that will be used to connect to this Database instance from any IDE tool. It also show port number , SID or other details.

Oracle Database Cloud Service Instance Details


To start the service instance, click on the right symbol as shown in below screen shot and click on Start.

Oracle Database Cloud Service Instance Start


It opens below pop-up to confirm the start. Click on OK to start it.

Oracle Database Cloud Service Instance  Confirm Startup


You can track the status of this activity or other activities also from below window where it show start and end time of start up and stop.

Oracle Database Cloud Service Instance Activity LOg


You can follow the same steps to stop the running service instance.


Friday, August 19, 2016

SOA Cloud - Create Oracle Database Cloud Service Instance

Now days we hear lot about cloud and like to explore more on it. Recently Oracle launched cloud services that we can use to create service instances. This post is specific to Database Cloud service.

DBaaS (Database as a Service) is a service instance in Oracle Database Cloud. On premises setup we use to install Oracle database server on local hardware but in cloud, no need to have a setup, just need to confirm some parameters and we are good to use it.
In this post, we will show how you can create service instance of Oracle Database Cloud. Follow below steps for the same.


Login with your credentials that you have received from Oracle when you register for trial version.


Click on “Service Console” option as shown in below screen shot in “Oracle Database Cloud Service” section.
Oracle Database Cloud Service Console


Click on “Go to Console” to go to service console.

Oracle Database Cloud Service Console


Click on “Create Service” button to initiate the process of service creation.

Oracle Database Cloud Create Service


Step 2:  Subscription: Here you need to choose subscription type that cover Service Level and billing frequency. You can keep the default values for now.

Oracle Database Cloud Service Subscription


Step 3: Release: Here you need to choose Database release version, keep the default option (Oracle Database 12c release 1).

Oracle Database Cloud Service Release Version


Step 4:  Edition: Here you need to choose the database edition, again keep the default one selected (Enterprise Edition).

Oracle Database Cloud Service Edition


Step 5:  Details: Here you need to set some parameters to get the service ready for use.
First of all go to “Service Configuration” section and set below parameters.

Service Name: cloudDB12c (you can set any name as per your standards)

Time Zone: Select the time zone.

SSH Public Key: Browse the public key file that you have created in last. In case you don’t have that file, you can refer this post to generate SSH public key.

Oracle Database Cloud Service name


Oracle Database Cloud Service Public Key


Then go to “Backup and Recovery Configuration”. In this section, you need to choose the backup option. Refer Oracle Storage Cloud Service post if you haven't created Oracle Storage Cloud service already. 

Backup Description: Choose Both Cloud Storage and Local Storage option.
Cloud Storage Container: Enter the details as per below syntax. For this post, it will be storage-garg/backupDB.

storage-identitiy_domain/containerName

Cloud Storage User Name: Username configured while creating cloud storage container. 

Cloud Storage Password: Password configured while creating cloud storage container. 
Database Cloud Service Backup


Then move to “Database Configuration” section, where you need to provide the password for SYS & SYSTEM accounts.


Oracle Database Cloud Service Database Configuration


Step 6:  Confirmation: Here you need to review the summary and click on create to create the service.

Database Cloud Service Summary


Step 7:  Once you create database cloud service, below window show the status of that service. Status shows as “In Progress” and it takes around 30 to 60 minutes to setup this service so you need to wait for that much time to use it.


Oracle Database Cloud Service Status


SOA Cloud- Generate SSH Key Pair using Putty

In Oracle Cloud, we need to have public key when we need to create a service instance and private key is also required when we need to access it using SSH utility. In this post, we will show how we can create key pair (private and public keys).

For this post, we will use PUTTY to generate these keys as it is available for both windows and Linux.

Follow the below steps to generate key pair.

Step 1: Download the Putty key generator from www.putty.org link as shown in below screen shots.

SOA Cloud Download Putty


SOA Cloud Download Puttygen.exe

Step 2: Open the puttygen.exe file and it opens another window as shown below. In parameters, select “SSH-2 RSA” and “2048” in Number of bits in the generated key as SSH 2 is most recent version of SSH.

SOA Cloud Set SSH2 and Bits


Click on generate button to generate the keys and it opens the below window where you need to move the mouse in empty area as highlighted in red box in below screen shot to generate the key. You need to keep the mouse moving until key generation is successful.

SOA Cloud Generate Key


You see public key gets generated as highlighted in below screen shot along with Key comment; you can update the key comment name as per your naming standards if required.
You can also secure this key by entering the password in Key passphrase but for now we keep it blank.

SOA Cloud Generated Public Key


Copy the text for public key and put it to notepad and save it with .pub extension as we need this public key file to create service instance later.

SOA Cloud save Generated Public Key


Now, save the private key by clicking on “Save Private Key” button. Once you click it, it opens a pop up showing that you are going to save the key without any password, click on yes to save it.

SOA Cloud save Generated Private Key


Thursday, August 18, 2016

SOA Cloud - How to register for SOA Cloud Service Trial Version

In this post, I will show you how you can register for trial version of SOA Cloud Services.
You need to follow below steps in sequence for trail registration.

Step 1: Go to URL: https://cloud.oracle.com/tryit and you notice there are mainly two categories as mentioned below.

1. Oracle's Platform (PaaS) and Infrastructure (IaaS) Cloud Services
2. Application (SaaS) and Data (DaaS)

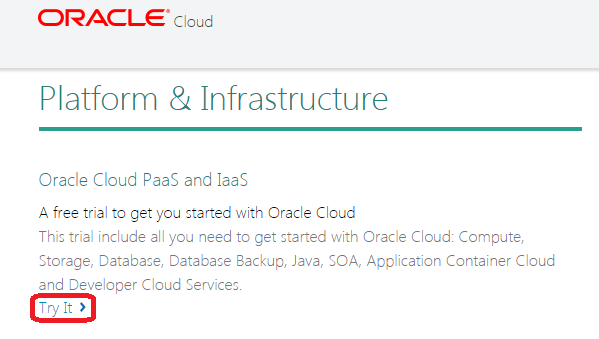
Under each category there are multiple options available. Since we are working with Oracle SOA Cloud Services and that comes under Paas and IaaS category. So go to that category and select very first option as highlighted in below screen shot.


SOA Cloud Service Registartion


Step 2: Once you click on “Try It” option, it take you to Oracle login page where you need to enter your credentials.

Note: You need to have Oracle account setup before you proceed to this step, if don’t have Oracle account then you can create it.

Once you enter your credentials, it takes you to next page where you need to enter your details like First Name, Last Name and Company Name etc.  You also need to verify your phone number by entering the verification code.

SOA Cloud Service Registartion


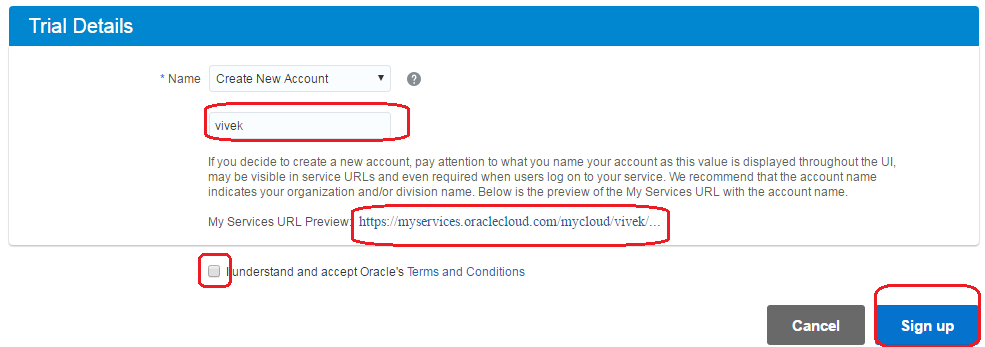
You need to mention “Identity domain” value, you can choose any value as that will get appended to your service URL as shown below in the screen shot.

Accept the Terms and Conditions and click on Sign Up.

SOA Cloud Service Registration Identity Domain


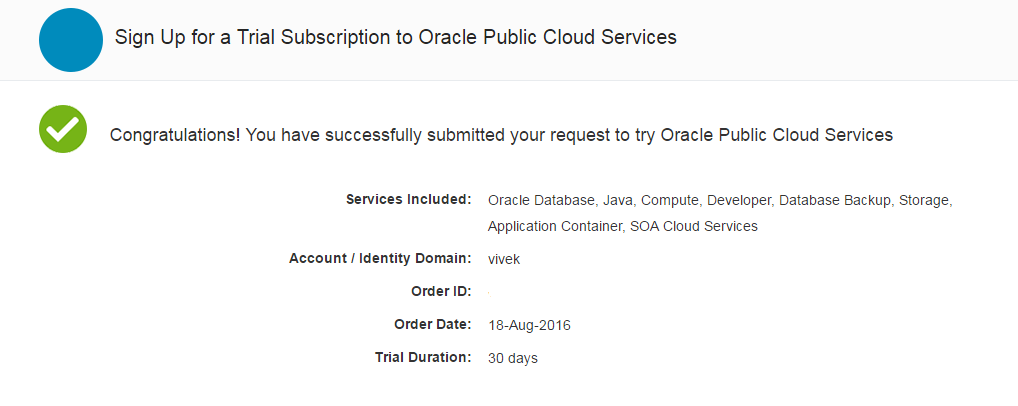
After Sign up, you see below success message. Now you should receive email from Oracle within 7 days with your username and password to access SOA Cloud Services and with setup instructions.

SOA Cloud Service Registration Success


Step 3: You receive email from Oracle with all required details and credential for login.


SOA Cloud Service Registration Email