Thursday, October 8, 2015

OSB 12c - Database Polling using DB adapter

Oracle introduced couple of new features in 12c version which is recently launched. For OSB, the major shift that we saw in 12c is that now we can use Jdeveloper to do the development which we use to do through OEPE (Eclipse). With that change, we can leverage the existing technology adapter in OSB as well which we use to have in SOA. In OSB 11g version, in case of Database interaction, we use to create DB adapter in Jdeveloper and later import all required files to OEPE and generate required services from that, but in this new version-12c as we development in Jdeveloper itself so we need not to follow same steps again, we can add the DB adapter directly in OSB project and do required operations.

In this post, we show you how to use DB adapter in OSB project. For that we have created a table in database, we poll the data from that table and write that information to one file.
First of all we need to create a new OSB project, so first create a new project and then in composite.xml file, right click on proxy service lane, choose “Insert Adapters” and select Database to add DB adapter.

OSB Database Adapter add adapter


Provide name to adapter and click on next. In next window, choose DB connection (In our case it is local as we read the data from local table) and click on browse button to select the outbound connection pool created earlier for DB adapter. This search feature is a new feature that is introduced in 12c, with this feature we can go to server and select the outbound connection pool; we can even create new connection pool with this option.


Configure OSB Database Adapter


In next window, choose “Poll for new or changed records in table” operation type as we need to poll the new or updated records then select the table from where we need to poll the record and also select primary key column. Also choose the column based upon that we need to read the record and select read & unread column values.

Configure OSB Database Adapter


Configure OSB Database Adapter


Once you complete all above steps, then you see DB adapter gets added to the composite but you see one issue in that adapter as we haven’t added the pipeline yet. To add pipeline, right click on middle pane choose Insert à Pipeline.

OSB Database Adapter Composite


Provide pipeline name and in service type choose “Any SOAP” as we will get the data in soap format from DB adapter. Ensure that “Expose as a proxy service” checkbox is unchecked as we already have proxy service created using DB adapter, if you keep that checked then you will notice that it will add one more proxy in the same composite.

OSB Database Adapter add pipeline


Now you can add wire DB adapter with pipeline. Then add file adapter to write the file and wire it to pipeline. Now go inside the pipeline and add route node after the start node in message flow. Add routing action inside route node, in routing select the write file adapter business service .

OSB Database Adapter


Add new record to source table and you notice that data successfully picked from that table and written to target file.


Thursday, September 24, 2015

OSB 11g - JMS Message Selector

In our previous post, we discussed about how to add and read custom header properties for JMS. In couple of scenario’s we need to use Message selector property for JMS. Let’s first understand what this property is and where this can be implemented.

In some cases our starting point is JMS queue/topic, where source system put the message to JMS queue/topic and OSB picks the message from that queue and process the message. Sometimes same queue/topics is used to process different messages e.g. source system put both “Sales Order” and “Shipment” messages to same JMS queue/topics but that messages should be picked by different OSB proxies as we have different logic for each message. This “Message Selector” property helps there, in Sales Order proxy service we mention that we pick only Sales Order message and in Shipment proxy we mention that we pick only shipment messages. Now let’s see how to implement this.

First create an OSB project and add required folder structure. Create proxy service that read the message from JMS queue, to create that right click on the proxy folder and click on new and choose proxy service option. Choose “Messaging service” as Service Type.

In Message Type configuration, select “Text” as Request Message Type as we will read simple text message to test this use case and choose “None” as Response Message Type as we are not sending any response back once we read the message from JMS queue.


JMS Message Selector Create Project
JMS Message Selector Create Proxy


JMS Message Selector Proxy Message Type


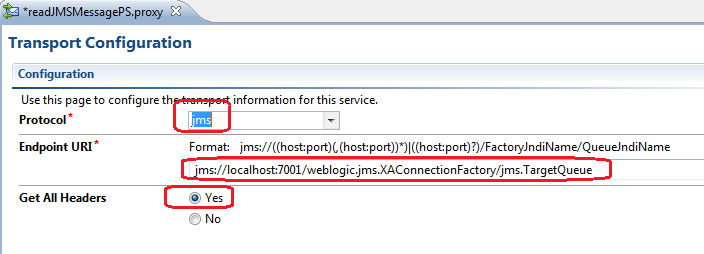
In Transport tab, choose jms from protocol drop-down as we are dealing with JMS queue i.e. we need to read the message from JMS queue. In Endpoint URI text box fill the required values for JMS endpoint URI, for this use case we use default connection factory and TargetQueue JMS queue. Choose default settings for all other tabs and save the business service.

Make sure that “Get All Header” option is set to yes as we need to read JMS header properties. If we don’t select this option then we not able to read the custom header property from JMS queue.

JMS Message Selector Proxy Transport


Go to next tab and open the advanced settings. Under that enter the value for “Message Selector”. E.g. in this case source system put the message to JMS queue with custom header property (“MessageType”), if this property value is “Valid” then only we need to pick   the message from JMS queue otherwise not.

JMS Message Selector Proxy property


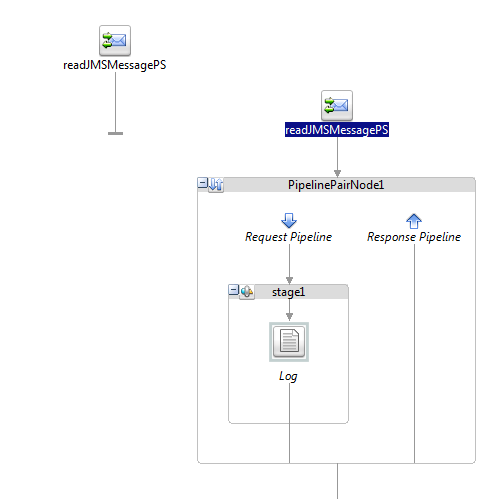
In the message flow tab of proxy service, add pipeline pair after start node. Add stage node in request pipeline and inside stage add log action. We added log action to log request message.

JMS Message Selector Proxy Message Flow


Click on log action and then click on expression and put $body variable to log the request message.

Save your proxy service and deploy it to server. Now put message to JMS queue with custom header property “MessageType” equal to “Valid”. Proxy picks the message and do the check based on Message Selector property, since that is true so it process the message.

JMS Message Selector Success Testing


Now repeat the above test case but put the message to JMS queue with custom header property “MessageType” equal to “Invalid”. Proxy does the check based on Message Selector property, since that is false so it will not process the message and message will remain in queue itself.

JMS Message Selector ErrorTesting


Thursday, July 16, 2015

OSB 11g - Read JMS Custom Header Properties

JMS queue and Topics are mainly used for persistence and reliability, we use JMS adapter to connect to JMS queue or topic in SOA Suite but in OSB we use jms protocol to connect to JMS queue and topic, we can also use JCA adapter but jms protocol is always preferred.  We usually deals with XML or Non-XML content while working with JMS queue and topic and there are some pre-defined header properties for JMS queue and topic that are used for specific purpose.

Sometime we come across a requirement where we need to read extra parameters from JMS queue/topic, these extra parameters are custom JMS header properties. We can read custom header property for JMS queue in OSB.

In this post, we show how to read custom JMS header properties in OSB. For this post, we created one sample queue (TargetQueue) on local server and we put the message to this queue along with custom header property. We created one OSB project in eclipse under OSB configuration and created required folder structures.

In previous post, we see how we see set custom header property for JMS queue. Click here to read that post.

First create proxy service that will read the message from JMS queue, to create that right click on the proxy folder and click on new and choose proxy service option. Choose “Messaging service” as Service Type.

In Message Type configuration, select “Text” as Request Message Type as we will read simple text message to test this use case and choose “None” as Response Message Type as we are not sending any response back once we read the message from JMS queue.

OSB_ReadCustomHeaderProperty_CreateProject

OSB_ReadCustomHeaderProperty_CreateProxy

OSB_ReadCustomHeaderProperty_serviceType


In Transport tab, choose jms from protocol drop-down as we are dealing with JMS queue i.e. we need to read the message from JMS queue. In Endpoint URI text box fill the required values for JMS endpoint URI, for this use case we use default connection factory and TargetQueue JMS queue. Choose default settings for all other tabs and save the business service.

Make sure that “Get All Header” option is set to yes as we need to read JMS header properties. If we don’t select this option then we not able to read the custom header property from JMS queue.
OSB_ReadCustomHeaderProperty_Transport


In the message flow tab of proxy service, add pipeline pair after start node. Add stage node in request pipeline and inside stage add log action. We added log action to log custom jms header property value.

OSB_ReadCustomHeaderProperty_MessageFlow


Click on log action and then click on expression. We read the JMS custom header property from inbound variable, you can read the custom header property value using below syntax.

$inbound/ctx:transport/ctx:request/tp:headers/tp:user-header[@name='MessageType']/@value

Here MessageType is custom header property name.

OSB_ReadCustomHeaderProperty


Save your proxy service and deploy it to server. Now put message to JMS queue along with custom header property. Proxy picks the message and writes custom header property value in log file.

OSB_ReadCustomHeaderProperty_Testing


Thursday, July 2, 2015

OSB 11g - Set JMS Custom Header Properties

JMS queue and Topics are mainly used for persistence and reliability, we use JMS adapter to connect to JMS queue or topic in SOA Suite but in OSB we use jms protocol to connect to JMS queue and topic, we can also use JCA adapter but jms protocol is always preferred.  We usually deals with XML or Non-XML content while working with JMS queue and topic and there are some pre-defined header properties for JMS queue and topic that are used for specific purpose.

Sometime we come across a requirement where we need to send extra parameters to system through JMS queue/topic but we don’t want to send that in message content so to achieve that we can use custom JMS header properties. We can set custom header property for JMS queue along with value and that can further read by target system and get required parameter value.

In this post, we show how to set custom JMS header properties in OSB. For this post, we created one sample queue (TargetQueue) on local server and we put the message to this queue along with custom header property. We created one OSB project in eclipse under OSB configuration and created required folder structures.

First create business service that will put the message to JMS queue, to create that right click on the business folder and click on new and choose business service option. Choose “Messaging service” as Service Type.

OSB Set JMS Custom Header Properties Create Business Service


In Message Type configuration, select “Text” as Request Message Type as we will send simple text message to test this use case and choose “None” as Response Message Type as we are not expecting any response back once we put the message to JMS queue.

OSB Set JMS Custom Header Properties Create Business Service


In Transport tab, choose jms from protocol drop-down as we are dealing with JNS queue i.e. we need to send that message to JMS queue. In Endpoint URI text box fill the required values for JMS endpoint URI, for this use case we use default connection factory and TargetQueue JMS queue. Choose default settings for all other tabs and save the business service.

OSB Set JMS Custom Header Properties JMS Endpoint URI


Now let’s create proxy service, for that right click on newly created business service, click on Oracle Service Bus and then choose Generate Proxy service option. This will create the proxy service. Open the proxy service and open the message flow tab.

OSB Set JMS Custom Header Properties Create proxy Service


In the message flow tab of proxy service, you see route node is added as we created proxy service directly from business service. Since we need to set custom header property for JMS queue so we need to add Transport Header action in the request action of route node.

OSB Set JMS Custom Header Properties Proxy Message Flow


Open the Transport header action and in first tab (Transport Header) click on “Add Header” button, this will add one header in below window. To set custom header property for JMS, choose “Other” and mention custom header property name, for this use case we set “MessageType” as custom header property for JMS queue. Then choose “Set Header to:” and click on <Expression> and assign value to custom header property.

OSB Set JMS Custom Header Properties


Save your proxy service and deploy it to server. Now test the proxy service, to test it open OSB test console and send text message. Then go to JMS queue and open the message, you see custom header property showing in the JMS queue.

OSB Set JMS Custom Header Properties Testing


OSB Set JMS Custom Header Properties Testing


Friday, June 5, 2015

OSB 11g - Debug Proxy Service Message Flow In Eclipse

As we know, we can do Oracle Service Bus development by two ways, either we can use SB Console or we can use Eclipse IDE. There are many features available in Eclipse that we don't see in SB console and one of it is Debugger. In Eclipse there is visual debugger available that helps us to debug the proxy service message flow. In this post, we see how to use Eclipse debugger and debug simple proxy service message flow. For this post, we have prepared one sample project, that contains one business service that further invokes external service and we have created a wrapper proxy service for that business service. In the message flow, we have used route node to route the message to business service and added log activity to log the request message.

OSB Eclipse Debugger Sample Project


Before we start debugging proxy service message flow, we need to ensure that server is running in debug mode. If it not then we need to restart it in debug mode, for that first open the server view by going to Window -> Show View -> Servers. This opens the server view, to restart server in debug mode, right click on the server and click on "Restart in Debug" option. Once server restart complete , you notice server state is "Debugging, Synchronized".

OSB Eclipse Debugger Server View

OSB Eclipse Debugger Start Server in Debug Mode


Next step is to add toggle breakpoints, toggle breakpoints are added in the message flow where we want to stop our flow and validate it. We add two toggle breakpoint in this flow, one for Log action and other for routing action. To add toggle breakpoint for log action, right click on Log action and choose "Toggle Breakpoint" and repeat same step for routing action.  Once done we see two toggle breakpoints in message flow as highlighted in below diagram. There is no limit, we can add as many as toggle breakpoints in your message as per need.

OSB Eclipse Debugger Add Toggle Breakkpoint


OSB Eclipse Debugger Message Flow with Toggle Breakpoint


Now we test the proxy service from Eclipse and debug the proxy service message flow. To do that right click on proxy service , click on "Run As" and choose "Run on Server" and then later click on finish to start the testing. You can also run this proxy service from SB console or SOAP UI.

OSB Eclipse Debugger Test proxy Service


Once we click on finish, below window will come, in that window choose last option "Continue in the current mode".

OSB Eclipse Debugger Choose Server Mode


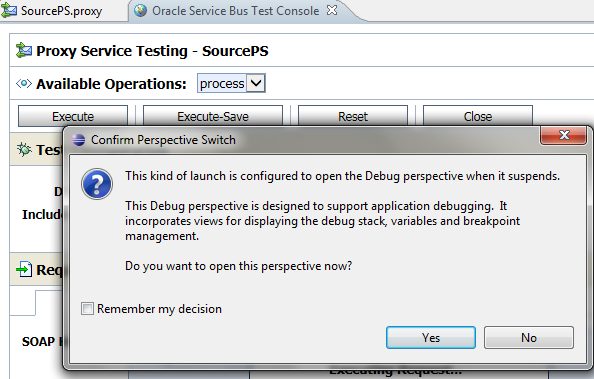
This opens the Test console window and it asks you to confirm the perspective switch, confirm it and click on "remember my decision". Enter the request message and click on execute, once you click on execute, flow stops at first toggle breakpoint in the message flow and that toggle breakpoint highlighted by green arrow as shown in below diagram. You see options to toggle in , out and resume as shown in below diagram.

OSB Eclipse Debugger Proxy Testing

OSB Eclipse Debugger Options


You can also check the content of the variable during this debugging and even though we can also change the content of the variable. Once you run all toggle breakpoints , you will see response of test console.
OSB Eclipse DebuggerVariables