Sunday, August 31, 2014

SOA12c - Templates

Template is term used for re-usable component. When we talk about templates in SOA these refers to re-useable stuff related to services, project and component. In earlier version of Oracle SOA Suite (11g) there were no provision of templates so every time we need to build same code again and again, this was very time consuming and error prone. To avoid this Oracle introduced templates in SOA 12c.

Oracle SOA 12c has couple of new features, one of it is Templates.  It means that we can generate templates and re-use them to create projects in SOA 12c. This reduces development efforts as developer need not to create same code again or simply need to use pre-built template. We can also share these templates between different teams so that they can follow same standards. We can also store these templates in MDS and reuse from there. These templates are discoverable in Oracle Jdeveloper. Once the template is saved, it is displayed in the Components window. There is no inheritance in templates that means that if in future we do changes in template that change will not reflect in application i.e. these changes to the source template will not be visible to current user of the template.

There are three types of templates available in Oracle SOA 12c. Below is the brief introduction of each of the template. These templates are discussed in later posts.


Project Template:  This template contains full project along with all the artifacts, components and references. We can create project template from Jdeveloper 12c, when we create this template from Jdeveloper 12c then template location gets added to the Jdeveloper preferences automatically but when we need to use external templates then we need to add external template location in the Jdeveloper. We can build new application from this project template, this new application imports all the artifacts, components and references which are there in project template.

Click here to see how to create and use project template.

Component Template:  This template contains service components. We can create template from any composite component. It also contains all reference components and resources which are there inside that component. You can find this template in the SOA composite application's Components window and it appears as a custom service component.


E.g. a BPEL process which calls database adapter can be used as component template. Once we build template from this BPEL, that template contains all the components, references and artifacts which are inside that BPEL process. Please note that this BPEL need not to be complied and need not to be complete.

Click here to see how to create and use component template.

Custom activity Template: This template contains an activity of a BPEL process which may include assign, transform, invoke, and receive and partnerlink. We can use this template in the same BPEL or in any other BPEL. This template also contains all the variables, references and artifacts which are related to that activity.  Custom activities will be available in the BPEL palette.

Click here to see how to create and use custom activity template.


Friday, August 22, 2014

SOA 12c - MDS Support For OSB

MDS is a repository where we upload all re-usable artifacts; these artifacts can be WSDL files or XSD files or DVM, XREF files. We can have both design time and run time MDS. Design time MDS is file based where we keep all the artifacts in local file system, run time MDS is DB based where we upload all the artifacts in DB schema. We generally use file based MDS during initial development and later migrate to DB based MDS.

MDS is really nice feature which we use for Oracle SOA suite but 11g version of service bus does not support MDS that means we can’t share artifacts between SOA and OSB using MDS so whenever we need to use the artifacts, we need to keep that artifact in service bus project only, we can’t use the artifacts which are referred by SOA project from MDS. This makes really difficult for developers to share the artifacts and this is major complain of most of the developer who works in OSB 11g. 

There are many new features introduced in Oracle SOA 12c. One of the features which I really like is MDS support for service bus; finally Oracle provided MDS support for service bus that means in 12c artifacts can be shared between SOA and service bus projects. Now we can use the WSDL which is there in MDS to generate business service or proxy service.

In 12c there is concept of design time repository (MDS) which is similar to file based MDS, this design time repository is based on Java DB. There is one additional feature provided in Jdeveloper 12c for service bus that is we can also publish artifacts to design time repository from service bus project itself that means we need not to manually copy artifacts from our project to MDS file path.


In this post, we will see how to use WSDL file which is there in MDS to generate service bus business service. To create the business service drag “HTTP” to composite pane. This will open the create business service wizard. In the step one provide the business service name and description, make sure transport is select as HTTP. Click on next, in the next step choose WSDL as service type and click on browse button to browse the WSDL file. This opens another wizard; this wizard shows different options from where we can select the WSDL file, in our case WSDL file is there in MDS so we choose where you can choose SOA-MDS. Go to that WSDL path and choose that WSDL.

MDS Support For OSB


This opens another Import service bus wizard. In the step one you see the Source URL of the WSDL is pointing to MDS. You can change the resource name if you want to, click on next to go to next step. In next step, you can see all the resources which will get added to your project from MDS, you can de-select the resource which you don’t require, once done click on finish.


MDS Support For OSB


SOA 12c - How to publish service bus artifacts to SOA Design time repository

We discussed about MDS and MDS support for Service Bus in 12c in previous post. We also saw how to use WSDL file which is there in MDS to create service bus business service. If you didn't read my previous post, you can click here to read that post. We also mentioned about one additional feature which is provided in Jdeveloper 12c in that post. We will discuss about that feature in this post.

In this post, we will see how we can use Jdeveloper 12c to publish artifacts from service bus project to SOA design time repository. SOA design time repository is file based repository which is based on Java DB. By using this feature, we need not to manually copy artifacts from project directory to MDS repository directory; we can perform this task from Jdeveloper itself. This makes development work really fast and less error prone.

Above mentioned feature was not there in previous of Jdeveloper which is 11g. This is new feature which is introduced in Jdeveloper 12c only. This feature is also available for SOA projects. You can also publish SOA project artifacts to design time repository from Jdeveloper.


Let’s start and see how this new feature works. We have created one sample service bus project, click here to see how to create sample service bus from Jdeveloper 12c. You can also create service bus project from service bus, if you want to see how to create project from service bus then click here. We have one WSDL file there in the project which we will publish to SOA design time repository from Jdeveloper 12c. To publish that WSDL file, right-click on that and choose Service Bus à “Publish To SOA Designtime Repository”. You can perform this for XSD file as well.

publish service bus artifacts to SOA Design time repository


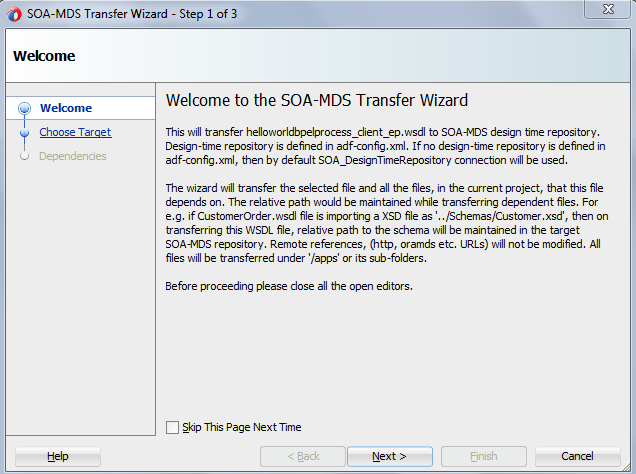
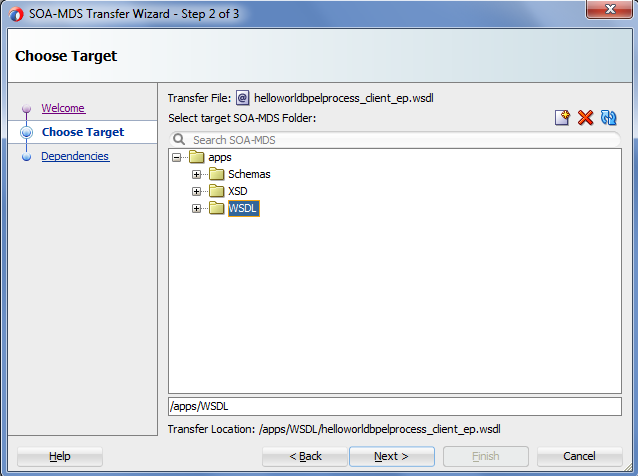
This open MDS transfer wizard which helps to publish the artifacts to design time repository. In first step just click on next, in second step you see apps folder and different folders under that, you can choose the folder to which you want to publish this file and if that folder is not there then you can also create a new folder and choose that folder, once done click on next.


publish service bus artifacts to SOA Design time repository


publish service bus artifacts to SOA Design time repository


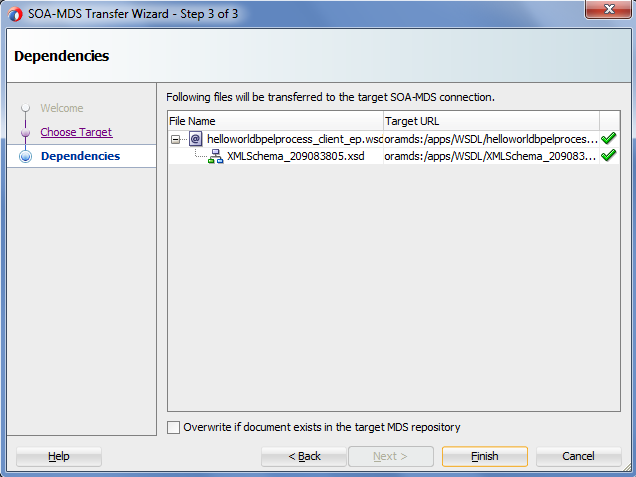
In third step, you see all the files which will get publish to MDS. If you noticed we only selected WSDL file to publish to design time repository but this also shows XSD file along with that WSDL file because WSDL file has reference to that XSD file so XSD file will also get published to design time repository along with WSDL file. There is option to overwrite the files which are already there in MDS with the new files, if you want to do that then check below check box.


Click on finish to complete the publish process. Now if you want to verify it, you can open the SOA design time repository in your Jdeveloper and see whether that WSDL file get published or not, you will notice both WSDL and XSD files are there in design time repository.

publish service bus artifacts to SOA Design time repository


SOA 12c - Custom Coherence Cache Name

Cache name is used when we configure coherence adapter. We need to take special care when we give value to this property, if we provide wrong value then coherence adapter will not work and throw error.

We saw how to configure coherence adapter, if you didn't read that click here to read that post. While we configure the adapter we can use default JNDI or custom JNDI. Based upon which JNDI we use we need to provide cache name.  As we saw in previous post, when we use default JNDI then we need to use “adapter-local” as cache name. But if we don’t want to use that name then we have to create custom JNDI.

In this post, we see how to create custom coherence adapter JNDI and how to use custom cache name.

Before we create the outbound connection pool in admin console, we need to create cache config file. As we saw in previous post, there is one config file associated with each outbound connection pool. So first take default config file and make changes to it.

Change the name of file from adapter-local-cache-config à adapter-Sample-cache-config

Then change the content, provide your cache name.

You can download the sample file from here.

Coherence Cache config file


Now we will create outbound connection pool.

To create custom JNDI, first go to admin console then go to Deployments àCohereneAdapter à Configuration à Outbound Connection pool

Click on New to create new outbound connection pool.

Coherence Adapter JNDI


Provide outbound connection pool name and click on next.

Coherence adapter outbound connection pool


Once you are done with outbound connection pool creation then go to newly created outbound connection pool.

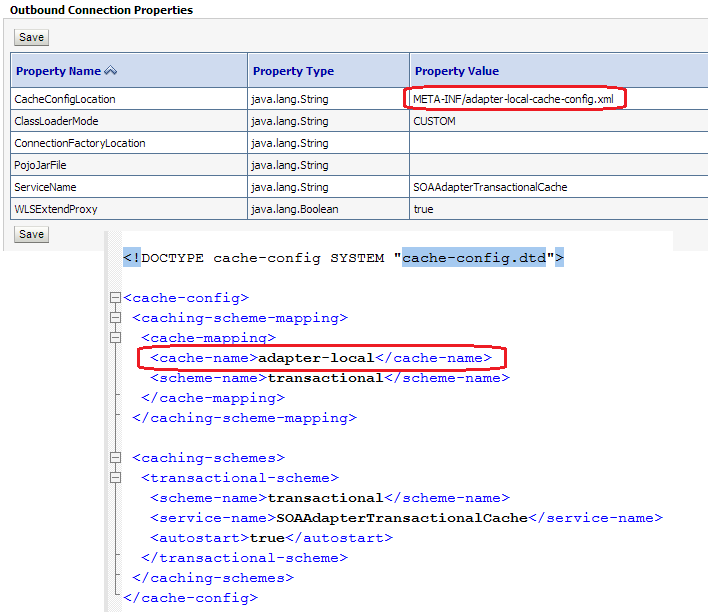
Provide the cache config file location; we already created this file in earlier step.
Also provide Service name.

Custom cache name


Once you are done then update the adapter. Now you can use this custom cache name in your adapter.


SOA 12c - Coherence Default Cache Name

In previous post, we saw how to configure coherence adapter. You must have noticed that we used default cache name “adapter-cache” and wondering from where we got that name. In this post we see how to get cache name.

I recommend you to read previous post before to start with this post.

We have three default JNDI’s for coherence adapter.
  • eis/Coherence/Local
  • eis/Coherence/Remote
  • eis/Coherence/XALocal

As you noticed, when we configured the coherence adapter we used the first default JNDI. We can also use custom coherence JNDI, click here to see how to create and use custom coherence JNDI.

Now to check the cache name, click on the JNDI which we used. To go to that JNDI, first open admin console; go to Deployments à CoherenceAdapter à Configuration à Outbound Connection Pool.

Coherence Adapter JNDI


Click on the first JNDI. You see one cache config file location there.

Go to that location and open that file. You see cache name is mentioned there.

Coherence Cache Config File


So if we need to use first default JNDI then need to use adapter-local as cache name.


Wednesday, August 20, 2014

SOA 12c- Coherence Adapter

In previous post, we saw how to configure coherence adapter. In this post, we see how and where we can use this coherence adapter.

We have different operation in coherence adapter, Put operation is used to put the data to coherence cache and get operation used to get data from coherence cache.In this post, we see how to use this coherence adapter in real world.

We have created one database table (StudentInfo), we read the data (student information) from that table based on the Id (Student Id) which is primary key in the table. We use coherence adapter to get and put the data to cache. First we check whether the data is there in coherence cache, if data is there then we directly get the data from cache instead of database and if data is not there then we query the data from database and then put the data to coherence cache so that next time when same request come, we get the data from cache instead of making a database call. This has positive impact on performance.

Let’s start with the use case.

Create one SOA project and add one BPEL to it.

First configure the db adapter which read the data from database. Provide DB JNDI name. Click here to see how to create Java derby database data source. Choose DB connection and choose “Select” operation.

Coherence adapter sample


Select “StudentInfo” table and add selection criteria.

Coherence adapter sample


Now drag coherence adapter and choose “Put” operation. Click here to see how to configure coherence adapter for Put operation.

Drag another coherence adapter and choose “Get” operation. Click here to see how to configure coherence adapter for Get operation.

Now composite should look like below.

Coherence adapter use case


Now open the BPEL and add three invokes to it, connect first invoke to queryCoherence adapter, second to “putDataToCoherence” adapter and third to DB adapter.

Now add one switch case after first coherence adapter which check whether the data exist in cache or not.

Coherence adapter use case


Now we set the coherence cache key at run time. First create a string variable and before query coherence cache assign value to that variable.

coherence cache key


Now go to coherence adapter invoke and go to Properties tab and select “jca.coherence.key”. Assign above created variable to it.

jca.coherence.key


Do it same for put data to coherence adapter invoke.

Your BPEL should look like below.

Coherence Adapter sample


Deploy your composite and test it.

Testing Result:

When we test this composite, it will get the data from database.

Coherence Adapter testing


When we test it again with same request then it take the data from cache instead of database.

Coherence Adapter testing


Download sample code from here.


SOA 12c - Create Java derby database data source

In this post, we see how to create Java Derby database data source. You can also read previous post which shows how to create java derby database connection in Jdeveloper.

To create derby data source go to admin console and go to Services --> Data sources

Click on "Generic Data Source".

Java derby Data source


Give data source name and JNDI name. Choose data base type as "Derby".

Java derby Data source


choose derby database driver.

Java derby Data source


Enter derby database detail and click on next.

Java derby Data source


Choose data source target.


Java derby Data source


SOA 12c- Unable to start jdeveloper - org.netbeans.InvalidException

Sometime Jdeveloper 12c starting showing below error.

Warning - could not install some modules:
oracle.external.miglayout - org.netbeans.InvalidException: Netigso: C:\Oracle\Middleware\Oracle_Home\jdeveloper\external\oracle.external.miglayout.jar: Not found bundle:oracle.external.miglayout
oracle.java_annotations - org.netbeans.InvalidException: Netigso: C:\Oracle\Middleware\Oracle_Home\jdeveloper\ide\lib\annotations.jar: Not found bundle:oracle.java_annotations
oracle.ide_print_api - org.netbeans.InvalidException: Netigso: C:\Oracle\Middleware\Oracle_Home\jdeveloper\ide\lib\ide-print-api.jar: Not found bundle:oracle.ide_print_api
com.jcraft.jzlib - org.netbeans.InvalidException: Netigso: C:\Oracle\Middleware\Oracle_Home\jdeveloper\netbeans\ide\modules\com-jcraft-jzlib.jar: Not found bundle:com.jcraft.jzlib
oracle.external.jxlayer - org.netbeans.InvalidException: Netigso: C:\Oracle\Middleware\Oracle_Home\jdeveloper\external\oracle.external.jxlayer.jar: Not found bundle:oracle.external.jxlayer
oracle.external.balishare - org.netbeans.InvalidException: Netigso: C:\Oracle\Middleware\Oracle_Home\jdeveloper\external\oracle.external.balishare.jar: Not found bundle:oracle.external.balishare
-------------------------------------
----------------------------------------

Resolution: to resolve this error, go to below path.

C:\Users\{user}\AppData\Roaming\JDeveloper

you see below highlighted folder, your folder may looks different.


go to this folder, delete all the folders except domain folder.


Start your jdeveloper, it should start now.