Saturday, December 15, 2012

OSB 11g - Call Asynchronous Web Service from OSB over http protocol

In my previous post, I explained how we can call Asynchronous web service from Oracle Service Bus using soa-direct protocol.  But in many scenario’s we need to invoke asynchronous web service from Oracle Service Bus using http protocol.

In this post I am going to explain how we can invoke Asynchronous web service (Async Composite) from Oracle Service Bus over http protocol and route the call back response from Asynchronous web service to another proxy service which in turn call another composite (Second Composite).

Call Async Composite
Call Asynchronous Composite
Follow below steps to invoke Asynchronous Composite from OSB.

Create an Asynchronous Composite. Name it “AsyncComposite” and deploy it on SOA server.
Create a new OSB project and add three folders to it.
          resources
          proxyServices
          businessServices
OSB Project
OSB Project
          Click on “resources” folder. Choose “XML Schema” from “Select Resource Type”, name it as “AsyncCompositeSchema” and add it to resources folder. Similar ways choose “WSDL” from “Select Resource Type”, name it as “AsyncCompositeWSDL” and add it to resources folder.
resources folder
resources folder
Now create business service to invoke Asynchronous Composite. To do this click on “businessServices” folder, choose “Business Service” from “Select Resource Type”, name it as “CallAsyncCompositeBS”.

Choose “WSDL Web Service” as “Service Type” and browse to above added WSDL file. Then select the port and submit it.
Async Business Service
BusinessService
        Accept defaults and save this business Service.
       
             Now create proxy service to invoke above created business service. To do this click on “proxyServices” folder, choose “Proxy Service” from “Select Resource Type”, name it as “CallAsyncCompositeProxy”.
       
      Choose “Business Service” as “Service Type” and browse to above created Business Service. Accept defaults and save this proxy service.
Proxy Service
Proxy Service

      Follow below steps to get response back from Asynchronous Composite.

      Create a synchronous or one-way composite, name it “SecondComposite” and deploy it to SOA server. You can create either synchronous or One-way as we created this composite to show that our call back proxy is working.

      Go to OSB project that we created above and click on “resources” folder. Add XSD and WSDL of SecondComposite to resources folder.
osb resources
resources folder
      Now create business service to invoke Synchronous Composite. To do this click on “businessServices” folder, choose “Business Service” from “Select Resource Type”, name it as “CallSyncCompositeBS”.

     Choose “WSDL Web Service” as “Service Type” and browse to above added WSDL file. Then select the port and submit it.

     Accept defaults and save this business Service.
   
     Now create proxy service to invoke above created business service. To do this click on “proxyServices” folder, choose “Proxy Service” from “Select Resource Type”, name it as “CallSyncCompositeProxy”.

Note down the “Endpoint URI “. In our case it is   “/CallAsyncService/proxyServices/CallSyncCompositeProxy”.
Endpoint URI
Endpoint URI

Now we will complete the sample. We will configure “CallAsyncCompositeProxy” to send the call back response from Asynchronous Composite to CallSyncCompositeProxy.

     Go to CallAsyncCompositeProxy and click on “Edit Message Flow”.
Osb Proxy Message Flow
Proxy Message Flow
     Right Click on route node and choose “Edit Route”.
Proxy Message Flow
Proxy Service Message Flow
      Add Assign activity to flow.
Assign Header
Assign Activity
Inside assign replace soap header to below one.
<soap-env:Header xmlns:ns1="http://schemas.xmlsoap.org/ws/2003/03/addressing">
        <ns1:MessageID>ws:uniqueAddress</ns1:MessageID>
        <ns1:ReplyTo>
        <ns1:Address>http://localhost:8011/CallAsyncService/proxyServices/CallSyncCompositeProxy</ns1:Address>
         </ns1:ReplyTo>
 </soap-env:Header>

Remember ReplyTo address refers to CallSyncCompositeProxy endpoints.
Change SOAP Header
SOAP Header
Edited Message Flow
Edited Message Flow
 Below are testing results
Test Console
Test Console
composite Instance
EM Console

Saturday, December 1, 2012

SOA 11g- How to move file from one location to other using File Adapter

We usually deal with files in our projects. We can perform multiple operations using file adapter like poll, read, write etc. But in some scenario we need to simply move file from one location to other without reading its content.
In this post I will explain how we can move file without reading its content using file adapter.
Follow below steps to move file from one directory to other directory.
  • Create a composite named “MoveFile” and create “One-Way” BPEL process.
One Way Bpel Process
One-Way BPEL Process

  • Drag & Drop File adapter from Component Palette to the External Reference swim lane. This will open adapter configuration wizard.
  • Enter Service name in Service Name field.  We named it “MoveFile” and click next.
  • Select Define from operation and schema (specified later), and click Next. The Operation page is displayed.
  • Synchronous Read File”.
Choose Sync Read Operation
Sync Read Operation

  • Enter a dummy physical path for the directory for incoming files, and then click next. We will assign this value at runtime.
Incoming File Path
Incoming File path

  • Enter a dummy file name, and then click next.
dummy file name
File Name

  • Select native format translation is not required (Schema is opaque), and then click Next. The Finish page is displayed.
Choose Native Format
Choose Schema

  • Open “MoveFile_file.jca” and modify the endpoint interaction.
          Earlier
<adapter-config name="MoveFile" adapter="File Adapter" wsdlLocation="MoveFile.wsdl" xmlns="http://platform.integration.oracle/blocks/adapter/fw/metadata">

   <connection-factory location="eis/FileAdapter"/>

  <endpoint-interaction portType="SynchRead_ptt" operation="SynchRead">

    <interaction-spec className="oracle.tip.adapter.file.outbound.FileReadInteractionSpec">

      <property name="DeleteFile" value="true"/>

      <property name="PhysicalDirectory" value="dummy"/>

      <property name="FileName" value="dummy"/>

    </interaction-spec>

  </endpoint-interaction>

</adapter-config>


   New
<adapter-config name="MoveFile" adapter="File Adapter"

                wsdlLocation="MoveFile.wsdl"

                xmlns="http://platform.integration.oracle/blocks/adapter/fw/metadata">

 <connection-factory location="eis/FileAdapter"/>

 <endpoint-interaction portType="SynchRead_ptt" operation="SynchRead">

    <interaction-spec className="oracle.tip.adapter.file.outbound.FileIoInteractionSpec">
   <property name="SourcePhysicalDirectory" value="SourceDirectory"/>

   <property name="SourceFileName" value="SourceFileName.txt"/>

   <property name="TargetPhysicalDirectory" value="TargetDirectory"/>

   <property name="TargetFileName" value="TragetFileName.txt"/>

   <property name="Type" value="MOVE"/>

  </interaction-spec>

 </endpoint-interaction>

</adapter-config>

File Adapter JCA File
Jca file
  • Now wire BPEL process to “MoveFile” file adapter.
wire bpel to adapter
BPEL Process

  • Open BPEL process, add one invoke activity and link it to MoveFile adapter.
Bpel Flow
BPEL Process Flow

  • Create 4 string variable with suitable name.
    <variable name="sourceDirectory" type="xsd:string"/>
    <variable name="sourceFileName" type="xsd:string"/>
    <variable name="targetDirectory" type="xsd:string"/>

    <variable name="targetFileName" type="xsd:string"/>
  • Populate above created string variables with required values.
Assign values
Assign Activity

  • Pass these parameters as headers to the invoke operation, for this open bpel process in source mode and add below 4 input Properties to invoke.
     <invoke name="Invoke_MoveFile"
            inputVariable="Invoke_MoveFile_SynchRead_InputVariable"
            outputVariable="Invoke_MoveFile_SynchRead_OutputVariable"
            partnerLink="MoveFile" portType="ns1:SynchRead_ptt"
            operation="SynchRead" bpelx:invokeAsDetail="no">
      <bpelx:inputProperty name="jca.file.SourceDirectory"
                           variable="sourceDirectory"/>
      <bpelx:inputProperty name="jca.file.SourceFileName"
                           variable="sourceFileName"/>
      <bpelx:inputProperty name="jca.file.TargetDirectory"
                           variable="targetDirectory"/>
      <bpelx:inputProperty name="jca.file.TargetFileName"
                           variable="targetFileName"/>

    </invoke>

  • Use below parameters for BPEL 2.0
     <bpelx:toProperties>
          <bpelx:toProperty name="jca.file.SourceDirectory"
                          variable="sourceDirectory"/>
        <bpelx:toProperty name="jca.file.SourceFileName"
                          variable="sourceFileName"/>
        <bpelx:toProperty name="jca.file.TargetDirectory"
                          variable="targetDirectory"/>
        <bpelx:toProperty name="jca.file.TargetFileName"
                          variable="targetFileName"/>
      </bpelx:toProperties>
  • Deploy the process and test it.


Saturday, November 24, 2012

SOA 11g - Set Composite Title

It is good practice to name composite instance. If you name your composite instance the you can uniquely identify the instance. Suppose you are receiving Sales Order from ERP system and each Sales Order has unique id so if we assign that Sales Order unique id to composite name then we simple identify that which instance is processing which Sales Order.

To give composite instance a name you simple need to add one java embedding activity inside BPEL and add one function inside that java embedding activity.

Here are the standard steps that you can follow to name a composite instance.

1.) Create a string variable and name it "Title".
2.) Add assign activity after receive activity and assign name to Title variable.

Set Title

3.) Add below function to set composite title inside Assign activity.

      ora:setCompositeInstanceTitle(bpws:getVariableData('Title'))


Now deploy your project and you should be able to see name of each instance.

Saturday, October 13, 2012

AIA 11g - Extend ABCS (Call external web service from ABCS extension point)

In my previous two posts Part-1 and Part-2, I explained how we can design & develop extension enabled connector service (Requester or Provider ABCS). In this post I will show you how we can call external web service from ABCS extension points.

Follow below steps to invoke external web service from ABCS extension point.

Step 1.)  Create a simple composite (external web service) which will be called from ABCS extension point.
  • Create a composite with name "CreateAccountSiebelReqABCSImplExtensionService". We should follow naming conventions while creating external web service that we are going to call from ABCS extension point.
                                       {ABCSName}ExtensionService
  • Change the service name during creating BPEL process to match that we have in concrete wsdl.
Create External Web Service

  • Choose "Based on a WSDL" template and use abstract wsdl (CreateAccountSiebelReqABCSImplExtensionAbstract.wsdl) which is there in ABCS project folder to create external web service. If you don't have that abstract wsdl then you can take concrete wsdl from MDS repository "ExtensionServiceLibrary" folder. But before using concrete wsdl don't forget to remove binding and service tag to make it abstract wsdl.

choose Abstract wsdl
  • Now go to composite.xml file and check what is the port Name. If it is not same as there is concrete wsdl then change it to match with that.
<service name="CreateAccountSiebelReqABCSImplV1Extension"
           ui:wsdlLocation="CreateAccountSiebelReqABCSImplExtensionAbstract.wsdl">
    <interface.wsdl interface="http://xmlns.oracle.com/ABCSImpl/Siebel/CreateAccountSiebelCoreReqABCSImplExtension/V1#wsdl.interface(CreateAccountSiebelReqABCSImplV1ExtensionService)"/>
    <binding.ws port="http://xmlns.oracle.com/ABCSImpl/Siebel/CreateAccountSiebelCoreReqABCSImplExtension/V1#wsdl.endpoint(CreateAccountSiebelReqABCSImplV1Extension/CreateAccountSiebelReqABCSImplV1ExtensionServicePort)"/>
  </service>
  • Choose operation, means for which extension point you want to call this service.
Choose Operation
  • Add whatever logic want to add in BPEL as per your requirment. I just added one assign activity to keep it simple.
External web service BPEL
  • Now deploy this composite to server.
Step 2.) Make configuration changes for ABCS to call above created web service.
  • Change location attribute value for service tag inside extension concrete wsdl of ABCS which is there in MDS "ExtensionServiceLibrary" folder. Earlier it was pointing to Mirror service which comes default with foundation pack, but now it should point to external service endpoint.
<service name="CreateAccountSiebelReqABCSImplV1Extension">
      <port name="CreateAccountSiebelReqABCSImplV1ExtensionServicePort"
            binding="abcsext:CreateAccountSiebelReqABCSImplV1ExtensionServiceBinding">
         <soap:address location="http://localhost:8001/soa-infra/services/default/CreateAccountSiebelReqABCSImplExtensionService/CreateAccountSiebelReqABCSImplV1Extension"/>
      </port>
   </service>

Here is the sample of the Modified concrete wsdl.
  • Change Service Configuration property inside AIAConfigurationProperties.xml file to enable extension.
Change Service Configuration Properties

Now we are ready to call external web service from one of the ABCS extension point. Test ABCS and see the results.

Test Results


You can download the code from here.


Go through previous posts (Post-1, Post-2) to create Extension Enabled ABCS.


AIA 11g - Design & Develop extension enable ABCS (Application Business Connector Service)- Part 2

In previous post (Part-1) we created Requester ABCS which is extension enabled. In this post we will move further and see what steps we need to perform before deploying Extension enabled ABCS.

Follow below steps before deployment of Extension enabled ABCS.
  • Create a concrete wsdl from abstract wsdl that is generated in last part. To create concrete wsdl  from abstract wsdl we need to add binding and service tag inside abstract wsdl.
    • Take a copy of  abstract wsdl and change it's name (remove abstract and add concrete at last). e.g "CreateAccountSiebelReqABCSImplExtensionConcrete"
    • Add Binding and Service tags inside above created wsdl file to make it concrete. Take care of naming convention while adding these tags. Below is example service tag.
                      <service name="CreateAccountSiebelReqABCSImplV1Extension">
                          <port name="CreateAccountSiebelReqABCSImplV1ExtensionServicePort"
                              binding="abcsext:CreateAccountSiebelReqABCSImplV1ExtensionServiceBinding">
                          <soap:address location="http://endpoint"/>
                        </port>
                     </service>
    • Initially, at time of development, the concrete wsdl points to sample Extension service that is shipped with foundation pack. so change your location attribute and below is example of modified service tag.
                     <service name="CreateAccountSiebelReqABCSImplV1Extension">
                          <port name="CreateAccountSiebelReqABCSImplV1ExtensionServicePort"
                              binding="abcsext:CreateAccountSiebelReqABCSImplV1ExtensionServiceBinding">
                          <soap:address location="http://localhost:8001/MirrorServlet/mirror"/>
                        </port>
                     </service>
    • MirrorServlet is a service which comes with foundation pack, function of this service is to send same data is response as it gets in request.
Here is the sample concrete wsdl file.
  • Now we should push concrete wsdl into MDS repository to the folder "ExtensionServiceLibrary".
  • In Composite.xml of the Requester ABCS a runtime wsdl with concrete binding must be specified to invoke external reference service. In composite , attributes of the element, binding.ws, cannot be empty.
  • To deploy the composite that references external web service, which is defined using an abstract wsdl, the attribute of the element binding.ws must be populated. Here WSDL refer to concrete wsdl.
<binding.ws port="[namespace of the extension service as defined in the WSDL]/V1#wsdl.endpoint(<Name of the Service as given in the WSDL>/<Name of the Porttypeas given in the WSDL>" location="[location of the concrete WSDL in the MDS]" xmlns:ns="http://xmlns.oracle.com/sca/1.0"/>
  • Below is the example of binding.ws.
<binding.ws port="http://xmlns.oracle.com/ABCSImpl/Siebel/CreateAccountSiebelCoreReqABCSImplExtension/V1#wsdl.endpoint(CreateAccountSiebelReqABCSImplV1Extension/CreateAccountSiebelReqABCSImplV1ExtensionServicePort)"
 location="oramds:/apps/AIAMetaData/AIAComponents/ExtensionServiceLibrary/Siebel/V1/CreateAccountSiebelReqABCSImplExtensionConcrete.wsdl"  xmlns:ns="http://xmlns.oracle.com/sca/1.0"/>

  • Now deploy Requester ABCS to your server.

You can download Requester ABCS Code from here.


Next post explain how we can invoke external web service from one of the ABCS extension point.

Saturday, September 29, 2012

AIA 11g - Design & Develop extension enable ABCS (Application Business Connector Service)- Part 1

A key feature of AIA is ability to call extension service from ABCS. This makes ABCS more flexible for futures changes mean it provide customer the ability to extend the ABCS without customizing it. This applies to both Requester and Provider ABCS. 
Number of extension points in ABCS depends on exchanges pattern (request-response or fire- forgot). ABCS support four extension points in request-response irrespective its synchronous or asynchronous mode. 

Below is example of request-response ABCS with four extension points.

Extension Points


Extension points in request-response mode
  • Extension prior to ABM to EBM transformation.
  • Extension before Invoke.
  • Extension prior to EBM to ABM transformation.
  • Extension prior to send response.
Extension points in fire-forgot mode
  • Extension prior to ABM to EBM transformation
  • Extension before Invoke
   
    Follow below steps to design extension enable ABCS.
  • Start creating ABCS with service constructor.
Create ABCS with Service Constructor

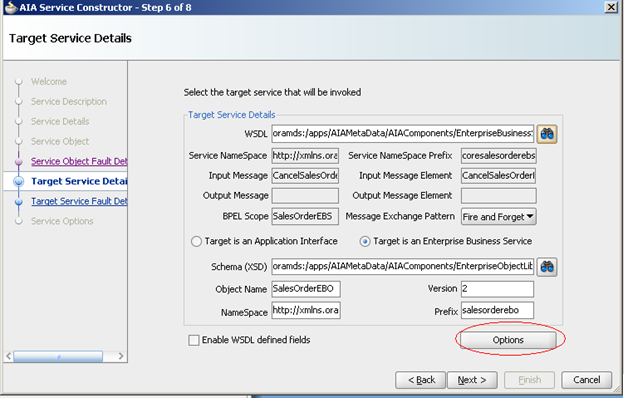
  •  Click on the “Option” button in Target Service Details window. This will open a new window.
Click Option Button
  • Select “Enable Extension” checkbox.
Select Enable Extension checkbox
  • Browse and select the WSDL required for Extension. If you don’t have any WSDL file then you can choose any runtime WSDL file.

Browse Extension WSDL
  • This will create ABCS having extension enabled.
Extension Enabled ABCS
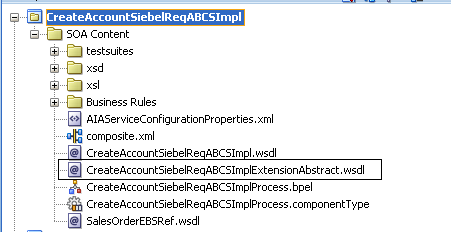
  • Also this will create one Abstract WSDL file which we use in next post to extend this ABCS.


EXtension enabled Requester Service
  •      In service configuration properties you can see four new properties. These properties used to turn on or off extensions.


Service Configuration Properties


Extensibility Point   
        Service Operation Name
     Extension prior to ABM to EBM transformation
       PreXformABMtoEBM
      Extension before Invoke  
       PreInvokeEBS
     Extension prior to EBM to ABM   transformation
       PostXformABMtoEBM
     Extension prior to send response
       PostInvokeEBS


Go through next post which explains what steps we need to follow before deployment of extension enabled ABCS means completing Extension enabled ABCS.


Saturday, September 22, 2012

OSB 11g- Write file in OSB

In my previous post I explained how you can poll/read file in OSB. In this post I will explain you how to write file  in OSB.

Follow below step to write file in OSB.

Step 1.) Create new OSB project and Business Service.
  • First Create a session and then click on "Project Explorer".
Create New project
  • Add new project with the name "WriteFile".
Write File Project
  • Now click on newly created project to add new folder.
Add Folder
  • Add new folder inside "WriteFile" project with name "businessService".
business Service Folder
  • Now click on "businessService" folder to create business service and choose "Business Service" as "Resource Type".
Choose Resource Type

Step 2.) Fill details in Business Service.
  • Enter Business service name and choose "Service Type" as "Messaging Service". Click on "Next" button.
Name Business Service
  • Choose "Request Message Type"  based on what type of file you want to write.In my case it is text file so I will choose "Text". Choose "Response Message Type" as "None" as we don't need any response after writing the file.
Choose Message Type

  • Choose "file" protocol from drop down list.
file Protocol
  • Provide the "Endpoint URI" and click on "Add" button.
              file:///{Dirve Id}/filedir/

EndpointURI
  • Provide File Transport Protocol details. Click "Next".
Fill File Name

  • Accept all default values and save Business Service. Now your Business Service is ready to write text file.

Go through my previous post which explains how you can read/ poll file in Oracle Service bus.

                               Read/Poll  file in OSB