Saturday, September 29, 2012

AIA 11g - Design & Develop extension enable ABCS (Application Business Connector Service)- Part 1

A key feature of AIA is ability to call extension service from ABCS. This makes ABCS more flexible for futures changes mean it provide customer the ability to extend the ABCS without customizing it. This applies to both Requester and Provider ABCS. 
Number of extension points in ABCS depends on exchanges pattern (request-response or fire- forgot). ABCS support four extension points in request-response irrespective its synchronous or asynchronous mode. 

Below is example of request-response ABCS with four extension points.

Extension Points


Extension points in request-response mode
  • Extension prior to ABM to EBM transformation.
  • Extension before Invoke.
  • Extension prior to EBM to ABM transformation.
  • Extension prior to send response.
Extension points in fire-forgot mode
  • Extension prior to ABM to EBM transformation
  • Extension before Invoke
   
    Follow below steps to design extension enable ABCS.
  • Start creating ABCS with service constructor.
Create ABCS with Service Constructor

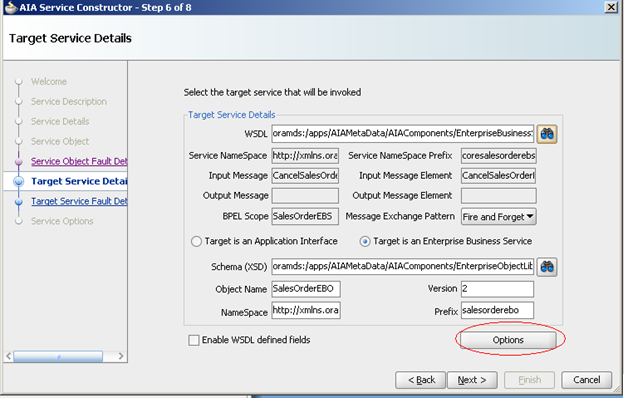
  •  Click on the “Option” button in Target Service Details window. This will open a new window.
Click Option Button
  • Select “Enable Extension” checkbox.
Select Enable Extension checkbox
  • Browse and select the WSDL required for Extension. If you don’t have any WSDL file then you can choose any runtime WSDL file.

Browse Extension WSDL
  • This will create ABCS having extension enabled.
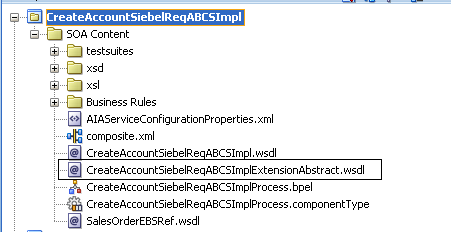
Extension Enabled ABCS
  • Also this will create one Abstract WSDL file which we use in next post to extend this ABCS.


EXtension enabled Requester Service
  •      In service configuration properties you can see four new properties. These properties used to turn on or off extensions.


Service Configuration Properties


Extensibility Point   
        Service Operation Name
     Extension prior to ABM to EBM transformation
       PreXformABMtoEBM
      Extension before Invoke  
       PreInvokeEBS
     Extension prior to EBM to ABM   transformation
       PostXformABMtoEBM
     Extension prior to send response
       PostInvokeEBS


Go through next post which explains what steps we need to follow before deployment of extension enabled ABCS means completing Extension enabled ABCS.


Saturday, September 22, 2012

OSB 11g- Write file in OSB

In my previous post I explained how you can poll/read file in OSB. In this post I will explain you how to write file  in OSB.

Follow below step to write file in OSB.

Step 1.) Create new OSB project and Business Service.
  • First Create a session and then click on "Project Explorer".
Create New project
  • Add new project with the name "WriteFile".
Write File Project
  • Now click on newly created project to add new folder.
Add Folder
  • Add new folder inside "WriteFile" project with name "businessService".
business Service Folder
  • Now click on "businessService" folder to create business service and choose "Business Service" as "Resource Type".
Choose Resource Type

Step 2.) Fill details in Business Service.
  • Enter Business service name and choose "Service Type" as "Messaging Service". Click on "Next" button.
Name Business Service
  • Choose "Request Message Type"  based on what type of file you want to write.In my case it is text file so I will choose "Text". Choose "Response Message Type" as "None" as we don't need any response after writing the file.
Choose Message Type

  • Choose "file" protocol from drop down list.
file Protocol
  • Provide the "Endpoint URI" and click on "Add" button.
              file:///{Dirve Id}/filedir/

EndpointURI
  • Provide File Transport Protocol details. Click "Next".
Fill File Name

  • Accept all default values and save Business Service. Now your Business Service is ready to write text file.

Go through my previous post which explains how you can read/ poll file in Oracle Service bus.

                               Read/Poll  file in OSB


Wednesday, September 19, 2012

OSB 11g - Read or Poll File in OSB

This post explains how you can read file in OSB. You can read any type of file like you can do in SOA.

Follow below steps to read file in Oracle Service Bus.

Step 1.) Create new OSB project and Proxy Service.

  • First of all create Session by clicking on "Create" Button and then click on "Project Explorer" to create new project.
Create Session
  • Enter the name of the project "ReadFile" and add it.
Create New Project
  • Now click on newly created project "ReadFile" to add new folders.
Read File Project
  • Add "proxyService" folders which contains proxy service that will poll/read the file from given location.

Proxy Service
  • Now click on newly created "proxyService" folder to create proxy service and choose "Proxy Service" as Resource Type.
Service Resource Type

Step 2.) Fill details in Proxy Service to read/poll file.
  • Enter proxy service name and choose "Service Type" as "Messaging Service". Click on "Next" button.
Proxy Service name and type


  • Choose "Request Message Type" based on what type of file you want to read/poll. In my case its text file so I will choose "Text". Choose "Response Message Type" as "None" because we don't need any response after reading the file. Click on "Next" button.
Request Message Type
  • Choose "file" protocol from drop down list.
file protocol
  • Provide the "Endpoint URI". Click on "Next" button.
                   file:///{Drive Id}/filedir/


file directory
  • Next step is to provide File Transport Protocol details. 
    • File Mask: Default value is *.* that means you can send any type of file to the service. I created "test.txt" file in C:/read directory for this post.
    • Polling Interval: It specifies the number of seconds between each polling event. Leave it as default.
    • Read Limit: It specifies the maximum number of files to process during each polling event.Default value is 10. If you set it to 0 that means all files that match the file mask at the time of polling event will be processed. Leave it as default.
    • Sort By Arrival : It forces the selection of files while polling based on their creation date. Remain it unchecked.
    • Scan SubDirectories: It says OSB proxy look for files recursively in any existing subdirectories. Leave it unchecked.
    • Pass By Reference : It tells copy the file to archive directory and pass a reference to the file in the message itself. Leave it unchecked.
    • Post Read Action: It tells we can either delete the file or archive the file after the message has been processed. Choose "delete" for this sample.
    • Stage Directory : It specifies where the files should be stored while they are being processed. So while polling, OSB first move file from polling directory to stage directory and process file from there.
    • Archive Directory : Directory where we want to archive the file. This will not be available if you choose "delete" as Post Read Action.
    • Error Directory: Directory where file will be sent of there is any problem or issue. 
File Transport Protocol Properties
  • Accept default values and you are done with your proxy service. 
  • Activate the session and to test proxy service put test.txt file in C:./read directory.
Create Business Service as per your requirement how you want to process file message.


Go through next post which explain how to write file in Oracle Service Bus.
                   
                                Write file in OSB
       

Wednesday, September 12, 2012

SOA 11g - Configure Retry able Jms Queue

Jms queues are used for reliable messaging. In some scenarios requirement do come when we need to configure retry able Jms queues that means when something error out in transaction ,we want that it should retry the same message multiple times.

Follow below steps to configure retry able Jms queue.

- Go to your Jms queue.
- Go to "Deliver Failure" tab.

Go To Delivery Failure

- Fill required values

       Redelivery Delay Override : Time interval between retries. It is in milliseconds.
       Redelivery Limit: number of retries
       Expiration Policy:
      • Redirect : redirect message to different queue.
      • Log : log the message.
      • Discard : discard message and it will be lost.

       Error Destination: If you choose "Redirect" then choose the queue to which you want to redirect message.
fill properties

Saturday, September 8, 2012

SOA 11g - Create and Deploy Java Web Service from Jdeveloper

In this post I will explain you how you can create Java web service in Jdeveloper and deploy the same from Jdeveloper itself.

Follow below steps to create and deploy Java Web Service

Step 1.) Create a new project in Jdeveloper.
  • Go to Application and right click on it and choose New Project.
Create New Project


  • Select Generic Project.
Choose Generic Project


  • Select Java and Web Services and add it to right pane.
Add Java and Web Service
  • You can change Default Package name as per your requirement and click Finish.
change package name

Step 2.) Create/Add Java code as per your requirement. I will simply add one Java class that contain only one function for this post.
  • Right click on newly created project and add new Java Class.
Create Java Class

  • Fill all necessary details and click OK.

Change Class and Package Name
  • Add your Java code inside Java Class
Add Java Code

Step 3.) Create Web Service from Java Code.
  • Go to newly created project and right click on above created Java Class. Click on "Create Web Service".
Create Java Web Service
  • Select the deployment profile as per your requirement.


Choose SOAP

  • You can also change Web Service Name.
Change service name
  • If you have more than one function in Java Class.You can choose the functions that you want to expose.
Java Exposed Functions
  • Accept all default and we are done with Web Service Creation.

Final Java Web Service

Step 4.) You can simple deploy above created Web Service to server. Just right click on project and click on deploy and you can choose the server to which you want to deploy it.

Deploy it to Server

Sunday, September 2, 2012

SOA 11g - Move Message from one JMS Queue to another using WLST

This post explains how we can move message between JMS Queues using WLST.

In this script first we will fetch Destination JMS queue information and simply move message from Old Jms Queue to new Jms Queue.

Follow below steps to move message from one JMS Queue to another using WLST

1.) Create queue.properties file which contain all the required information. You can download file from here also.
server.url=t3://localhost:8001
username=weblogic
password=welcome1

old.server.name=soa_server1
old.jms.server=SOAJMSServer
old.jms.module=SOAJMSModule
old.queue.name=RequestQueue

new.server.name=soa_server1
new.jms.server=SOAJMSServer
new.jms.module=SOAJMSModule
new.queue.name=ResponseQueue

2.) Now create moveQueue.py file which contain WLST script which moves message from one Jms queue to another. You can download this file from here.

from java.io import FileInputStream
import java.lang
import os
import string

print 'Read Queue Property File'
Queue_PropStream = FileInputStream('queue.properties')
Queue_ConfigProp = Properties()
Queue_ConfigProp.load(Queue_PropStream)

print 'Reading Server URL property from property file'
serverUrl = Queue_ConfigProp.get('server.url')

print 'Reading Server username property from property file'
Username = Queue_ConfigProp.get('username')

print 'Reading Server password property from property file'
Password = Queue_ConfigProp.get('password')

print 'Old Queue properties'
OldServerName = Queue_ConfigProp.get('old.server.name')
OldJMSServer = Queue_ConfigProp.get('old.jms.server')
OldJMSModule = Queue_ConfigProp.get('old.jms.module')
OldQueueName = Queue_ConfigProp.get('old.queue.name')

print 'New Queue properties'
NewServerName = Queue_ConfigProp.get('new.server.name')
NewJMSServer = Queue_ConfigProp.get('new.jms.server')
NewJMSModule = Queue_ConfigProp.get('new.jms.module')
NewQueueName = Queue_ConfigProp.get('new.queue.name')

print 'connecting to server'
print 'connect('+Username+','+Password+','+serverUrl+')'

connect(Username,Password,serverUrl)

print 'server run time'
print 'serverRuntime()'
serverRuntime()

print 'get target server queue'
print 'cd(/JMSRuntime/' + NewServerName + '.jms/JMSServers/' + NewJMSServer + '/Destinations/' + NewJMSModule + '!' + NewQueueName+')'

cd('/JMSRuntime/' + NewServerName + '.jms/JMSServers/' + NewJMSServer + '/Destinations/' + NewJMSModule + '!' + NewQueueName)

print 'target=cmo.getDestinationInfo()'
target=cmo.getDestinationInfo()
print ' got the target server info'

print 'Go To Old Queue'
print 'cd(/JMSRuntime/'+OldServerName+'.jms/JMSServers/'+OldJMSServer+'/Destinations/'+OldJMSModule+'!'+OldQueueName+')'

cd('/JMSRuntime/'+OldServerName+'.jms/JMSServers/'+OldJMSServer+'/Destinations/'+OldJMSModule+'!'+OldQueueName)

print 'move queue data'
print 'cmo.moveMessages('',target)'
cmo.moveMessages('',target)
print'Message have been succesfully moved from'+OldQueueName+' to '+NewQueueName


3.) Now run above created file.

        Go To

              $MIDDLEWARE_HOME /user_projects/domains/yourdomain/bin
              $MIDDLEWARE_HOME /user_projects/domains/yourdomain/bin>setDomainEnv.cmd
              $MIDDLEWARE_HOME /user_projects/domains/yourdomain> java weblogic.WLST moveQueue.py


Note: If moveQueue.py file is not there in $MIDDLEWARE_HOME /user_projects/domains/yourdomain directory then you can simply provide full path for queueMove.py file.